Finding the perfect test automation tool for your software is not an easy task.
We need to, first, accept that every software is unique and has its own way of being delivered. The kind of automation tools that are needed to adapt to the software testing life cycle highly depends on its resources, team, and strategy. So, there is no such thing as the best test automation tool.
There are, however, a range of popular tools that are in trend right now, which are designed to easily adapt to your project. Some examples of the popular automation tools used in both simple and complex systems, to give reliable and accurate quality of testing are Selenium, Appium, Katalon Studio, Cypress, and Playwright.
Today, let’s put one of the newest automation tools, that has proved to be a success, in the spotlight, Playwright.
Just like any tester, I faced some challenges in my previous projects which slowed the frontend automation process down. Writing excessive boiler plate code to set up the browsers, slow test executions, unreliable waiting times, difficulty finding the selectors and flaky tests, to name a few. It was not until a great colleague of mine introduced me to Playwright that brightened up the automation world for me.
What is Playwright?
Playwright is an open-source end-to-end test automation framework originating from Puppeteer, which is node.js-based and maintained by Microsoft.
In the traditional Selenium’s architecture, each HTTP request is sent separately and gets a JSON response, leading to a back-and-forth communication resulting in slowing down the entire process. Playwright, on the other hand, uses a single API.
It uses a single WebSocket to communicate with all drivers. This is why Playwright is revealing its identity as being one of the fastest and easiest automation frameworks in the software testing world. Fast and easy = Playwright. So how accurate is it? After reading this article, you will get a feel of whether this framework may be reliable enough to use for the software you are working on.
Why use Playwright?
Honestly, for me, this was the easiest framework to set up. A One liner command sets up your automation environment, and you can start automating.
Some of the reasons why software teams have changed their automation framework to Playwright is because it supports multiple languages such as JavaScript, Java, Python, and .NET C#, moreover, a diverse range of test runners are supported: Mocha, Jest, Jasmine, Cucumber. The cool part about running playwright tests is it runs headless browsers with event-driven architecture.
How do I set it up?
-
Playwright is compatible for all modern operating systems (Windows, Mac and Linux) with the requirement of:
1- Node JS
2- Visual Studio Code
Create a folder in your OS, for example, LEARN-PLAYWRIGHT, and open the folder in VS Code. Run the project’s root directory with the following command,
-
npm init playwright@latestThis is how the folder structure looks for a typical playwright project. You are provided with an example test project structure with a simple which includes all the prerequisites before creating a test spec. In the following example, I chose typescript as the language, hence the file names are in ts.
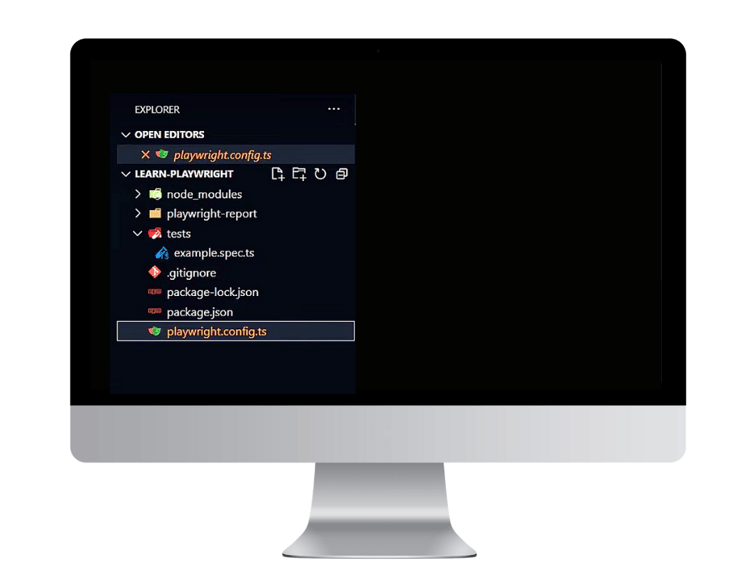
The playwright.config.ts contains the section called projects, which specifies the process that we will be testing. This is where you can configure the browser, context, and page fixtures. You can specify options globally or locally, and enable recording or test capture.
Here are the browsers that will be run by default. The tests will run under Chromium, Firefox, and WebKit (Safari).
// playwright.config.ts

import { defineConfig, devices } from '@playwright/test';


export default defineConfig({
 projects: [
   {
     name: 'chromium',
     use: { ...devices['Desktop Chrome'] },
   },
   {
     name: 'firefox',
     use: { ...devices['Desktop Firefox'] },
   },
   {
     name: 'webkit',
     use: { ...devices['Desktop Safari'] },
   },
 ],
});
The example tests that will be executed are in the file called example.spec.ts.
Playwright provides you with the JSON file which uses “test” as its script for running tests.
This is how a standard JSON file looks like.
{

 "name": "LEARN-PLAYWRIGHT",
 "version": "1.0.0",
 "description": "",
 "main": "index.js",
 "scripts": {
   "test": "echo \"Error: no test specified\" && exit 1"
 },
 "keywords": [],
 "author": "",
 "license": "ISC",
 "devDependencies": {
   "@playwright/test": "^1.16.3"
 }
}
A significant characteristic of Playwright is that it, by default, runs all tests headless. To change this behavior, use headless: false as a launch option in the config file.
import { defineConfig } from '@playwright/test';
export default defineConfig({
 use: {
   headless: false,
   viewport: { width: 1280, height: 720 },
   ignoreHTTPSErrors: true,
   video: 'on-first-retry',
 },
});
Running your example test and browser compatibility
Playwright is compatible with all modern browsers including Microsoft Edge (Chromium), Apple Safari (with Webkit), Mozilla Firefox and Chrome. It is enabled to run multiple tests in parallel as the default setting. Another factor that speeds up the execution time.
Run your first example test with the command below.
npx playwright test
The command to run tests headed is
npx playwright test --headed
If you want to run headed browser with npm user:
npm run test -- --headed.
If you want to run a single project, let’s say chromium, then you can command
npx playwright test --project=chromium
And it will run only in chromium.
During the execution, the tests have auto-waits to have the controls available, so there is no need to put an extra wait/sleep time for an action.
Since we have three different browsers that we are testing, Playwright automatically splits it into three separate workers. Now, once the test run completes, it generates the results into this folder called playwright report.
Tips for writing tests
As I have mentioned earlier, it takes little time to get started with writing test scripts in Playwright, since the example test file already gives you a clean, structured format. You can simply substitute your personal scripts to get started. Later on, you can improve your structure of code to make it cleaner and more object oriented.
test.describe('navigate to website', () => {
 test('navigate to website', async ({ page }) => {

   // Navigate to base url
   await page.goto('https://qestit.com/');

   })
 });
Fast way to locate selectors and iframes
Use the “page.waitForSelector()” method to wait for an element on the page to appear. This method takes a selector as an argument and returns a promise that resolves when the element is found. Once you identify the selector for the element you want to interact with, you can use the “page.click()” method to interact with the element.
When running in the headed browser, call page.pause() method from your script. Using a page.pause() method is a simple way to pause the Playwright script execution and inspect the page in Developer tools. It will also open Playwright Inspector to help with debugging.
Playwright is also well known for navigation handling between different pages, for example, iframes and different tabs. This is a reliable way to verify that the correct content is displayed in the current location, avoiding false positives/negatives.
Easy Debugging
It’s all about breaking it down. Troubleshooting is made human-friendlier by visually breaking down the lines with Playwright’s debugger. Add breakpoints, run the test in debug mode and the running test will stop at the breakpoint and will show you the situation. Playwright has a strict mode- so if there are similar selectors, the test breaks, and it fails a few steps ahead of the actual failure.
Codegen Extension: Write a test from scratch without writing code.
Codegen for testers is like the GitHub copilot for developers. It generates your user interactions into code. Codegen is a code generator that enables you to immediately create your test scripts accurately while you perform the actions in your browser.
For example, if you want to automate a test case in a page, run the command:
npx playwright codegen qestit.com
It basically cuts off your coding time from writing scripts to only clicking. Once your code is ready, you copy and paste it into your test class. This speeds up your implementation and execution!
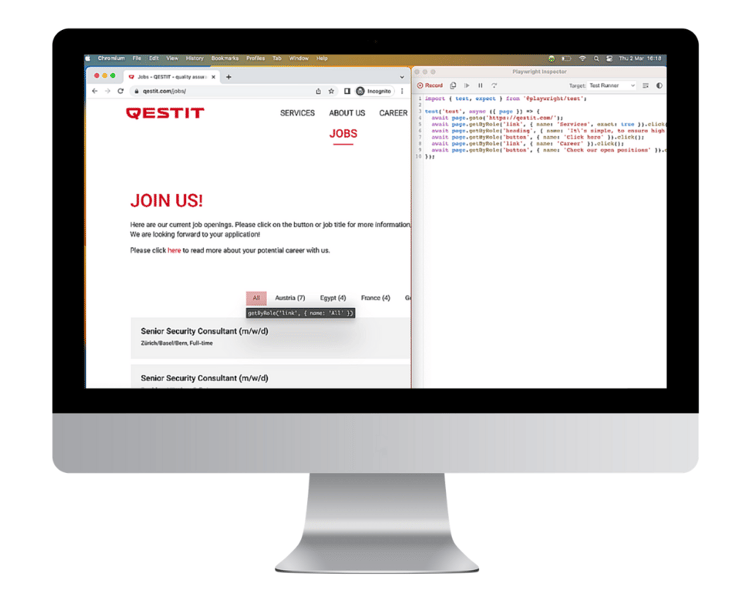
Extensions that speed up identifying selectors and debugging:
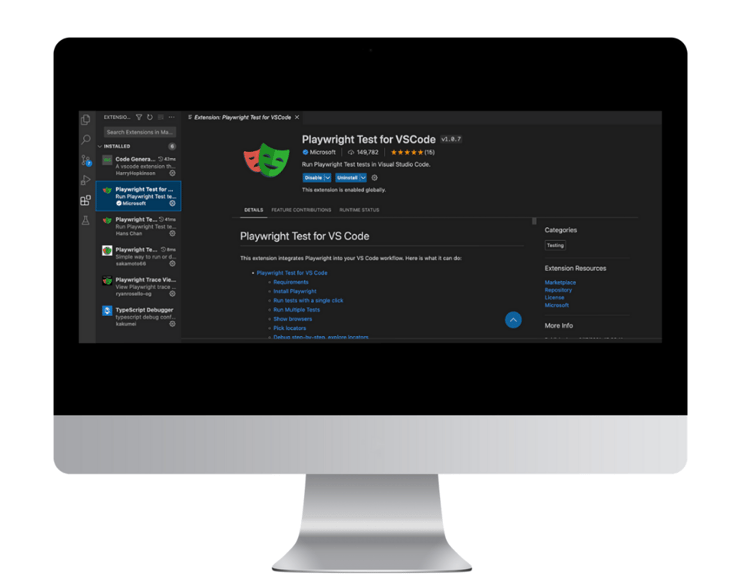
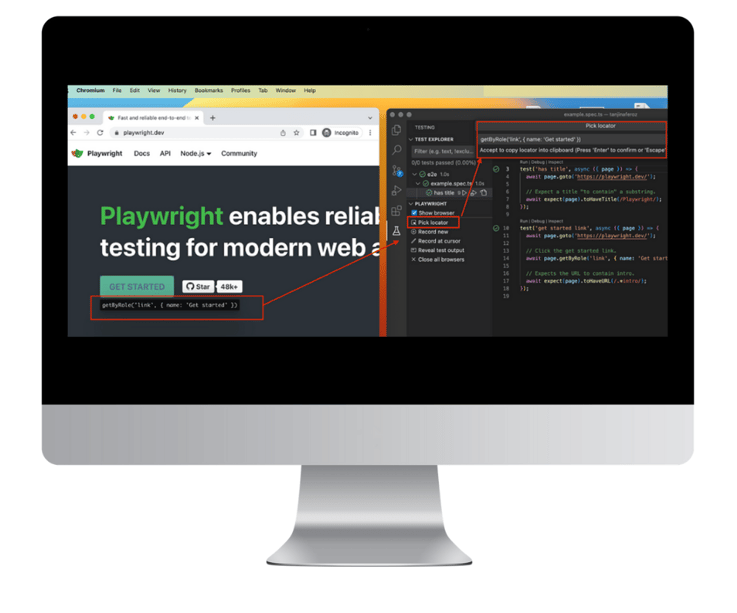
With the Playwright Test for VS Code extension, you are not even required to type commands. This extension simplifies identifying selectors by just hovering over the element and while the locator is written for you. All you have to do is click, enter, copy and paste.
-
- 1. Install the extension:
2. Go to the test case in your test explorer
3. Click “pick locator”
4. Check “show browser”
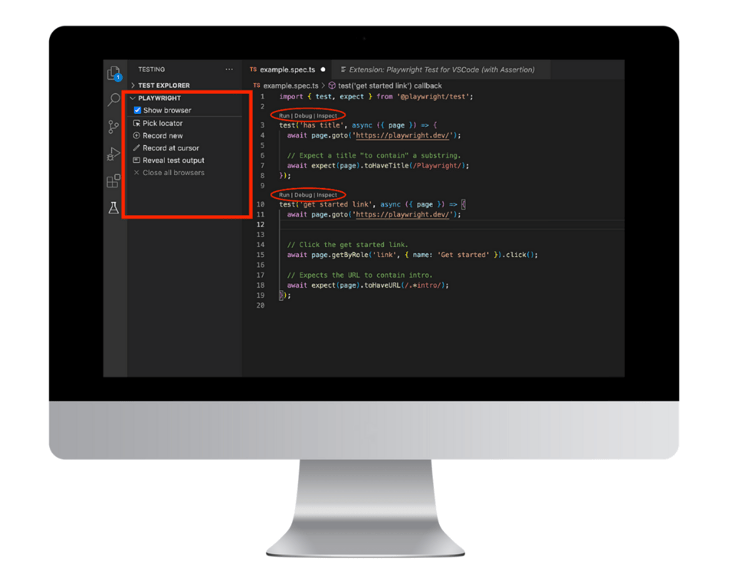
5. Hover over the element you have trouble locating, click it and the locator will appear on your editor.
Reports with interactive trace files
Playwright, by default, comes with many great reporters like List, Dot, Line, JSON, JUnit, and HTML Reporters.
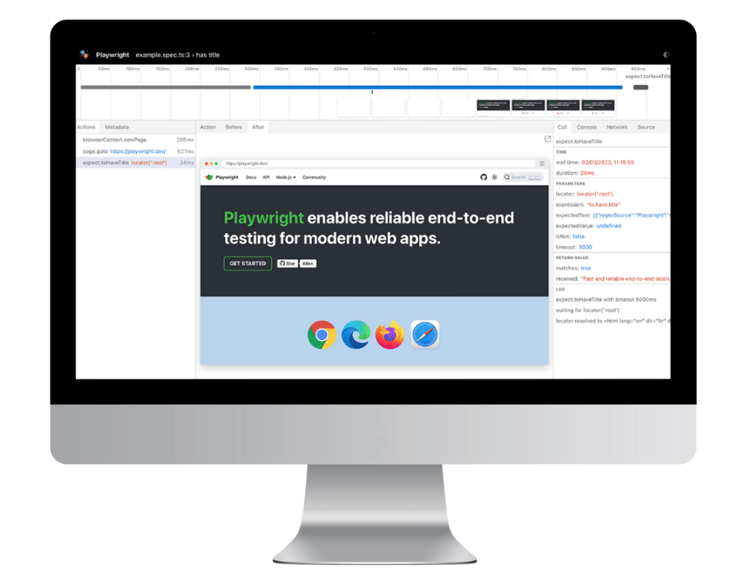
The command for getting test reports is npx playwright show-report. It shows a clean report in a browser where you can expand or minimize each step to see where the error occurred if any test fails.

Playwright also creates trace files. These are zip files that show you the timeline and actions done for the test. It is simply a DOM snapshot (that you can interact with). Now when you run the command for show report, you will get your interactive report.
Traces are run normally on a CI environment, but you can even locally run a trace through
the following command:
npx playwright test --trace on
To open the report, run:
npx playwright show-report
Easy to integrate
With Continuous Integration methods being popular, Playwright can easily be integrated to CI/CD pipelines in CI tools. Playwright can also integrate with the Docker environment and Selenium Grid.
Drawbacks
Playwright still has a fairly small community. It is not as complex as the other test automation frameworks which means there may be unknown issues that have not yet been experienced yet. With time, however, documentation of solutions and mitigations will evolve.
Another disadvantage is that it does not support real devices for Mobile Browser Tests in contrast to Cypress for example but does support emulators.
Playwright has a component testing ability that is not fully stable yet. This is a work in progress. The framework does however have an active and energized community who are working to reach the best of improvements.
Conclusion
It has been expressed by several IT professionals around the world that test automation is becoming a “living documentation” readable for both testers and key technical stakeholders. It has the ability to present the interactive behind-the-scenes of a system for teammates, both current and new. In other words, test scripts and structure are aimed at being easy to understand and not person dependent. Aspects such as maintainability and simplicity can be a challenge when it comes to the quantity of automated tests.
Playwright plays a significant role in making it easier to visualize what is happening during test execution, making it interactive and worthwhile for testers and even developers. Playwright can be a great automation tool worth using for your projects, as it provides clean presentation of test scripts and based on some of the helpful extensions mentioned above, it can save you minutes and even hours from your testing time.
Give it a shot: https://playwright.dev/docs/intro

Tanjina Feroz
Tanjina is a technical tester and has held several different roles within the QA process. Everything from being a requirements analyst, manual tester to having worked as a developer of automated tests. She is determined and positive, has a wide technical knowledge and great experience in testing and test design.
![PH_wp_[EN]_Blog listing - banner](https://qestit.com/hubfs/Website/Web%20pages%20photos/PH_wp_%5BEN%5D_Blog%20listing%20-%20banner.jpeg)


